Showing posts with label Computer Tips. Show all posts

Speed Up Browsing


When you connect to a web site your computer sends information back and forth. Some of this information deals with resolving the site name to an IP address, the stuff that TCP/IP really deals with, not words. This is DNS information and is used so that you will not need to ask for the site location each and every time you visit the site. Although Windows XP and Windows XP have a pretty efficient DNS cache, you can increase its overall performance by increasing its size. You can do this with the registry entries below:

Windows Registry Editor Version 5.00

[HKEY_LOCAL_MACHINESYSTEMCurrentControlSetServicesDnscacheParameters]

"CacheHashTableBucketSize"=dword:00000001

"CacheHashTableSize"=dword:00000180

"MaxCacheEntryTtlLimit"=dword:0000fa00

"MaxSOACacheEntryTtlLimit"=dword:0000012d

Make a new text file and rename it to dnscache.reg. Then copy and paste the above into it and save it. Merge it into the registry.

How To Set a Video as Desktop Background


Do you want to set a Video as your desktop background instead of wallpaper ?
Its very simple to impress your buddies by doing so... If you want set a video background, just follow this simple steps:-


1. First of all you need a VLC player installed in your OS to perform this task. If not than download the VLC player from internet and install it.


2. Run VLC media player,go to Settings->preferences->Interface->Main interfaces,then click on wxWidgets.Remove the tick on "Taskbar" and put a tick on "Systray icon".

3. Now go to Video ->Output Modules->DirectX.On the bottom right put a tick on advanced options check box.You will now see some options.Put a tick on "Enable Wallpaper Mode ".

4. Now,select playlist and put a check or tick on "Repeat current item ".


5. Press the Save button.Now close the Vlc player and run it again(to save the settings permanently).


6. Now play any video you would like to set as Wallpaper.Right click on the video and click on "Wallpaper". The video would be set as your wallpaper

Boot Defragment Faster Booting


a very important feature in Microsoft windows xp is the ability to do a boot defragment.
this basically means that all boot files are placed next to each other on the disk drive to allow for faster booting. by defaultthis option is enabled but some upgrade users have reported that it isnt on their setup.
1. start regedit. [go to run, type "regedit" and hit enter]
2. navigate to hkey_local_machinesoftwaremicrosoftdfrgbootoptimizefunction
3. select enable from the list on the right.
4. right on it and select modify.
5. change the value to y to enable and n to disable.
6. reboot your computer.

How to tell if you need more RAM


Press the Ctrl? + alt + delete key. now click on task manager and select the performance tab. look just under midway down on the right and you will see a box labeled ?physical memory (k). read the total right under that. that is your installed memory (in kilobytes). if you want to convert it to MB, divide it by 1024. now look at the box to its left that says commit charge (k). the total there will be how much memory is being used. you will also see a peak under that total which tells the highest amount of memory used since the last reboot. if the peak is lower than the physical memory total, then you don?t need additional memory. if the total commit charge is higher than the physical memory total, then additional memory would give you a significant performance boost because of how much of the memory your system is using with the operating system and applications.

Easy Steps To Speed Up Your USB 2.0 Drive


1. Open you My Computer or press Windows key +E
2. Right click on your USB drive then click Properties
3. Go to Hardware tab, select your USB device then click Properties”
undefined
4. Click on the change button.
“5. Go to Policies tab, Change the settings from Quick removal (default) to Better performance”
6. Click ok and Done.
“Note: If you perform this tweak it is now very important to use the Safely remove hardware notification icon before you unplug your USB device to avoid data loss or corruption.”


Share your PC’s internet wirelessly WITHOUT ROUTER!!

When it comes to our PC we have no other option
than to share the internet connection available to us by LAN cable using a router.
Today i’m gonna tell you how to share your PCs internet connection.

Prerequirements
  1. PC/laptop with wifi (windows xp/vista/7/8)
  2. Working internet connection
  3. Connectify Software. Get it here!
  4. Brain 
Step1
Download and install Connectify from the official website (or search for a pirated version :P).
Step2
After it has been successfully installed, run the software. Enter the SSID name of your hotspot under hot-spot name and set the password(if needed)
Step3
Select the active internet connection which is to be shared
Step4
Under Advanced Settings, select Share Over Wi-Fi (or your lan driver if you want to share the internet connection via lan cable) and select the sharing mode
Step5
Click on start hotspot below.
Step6
That’s it you are done!! Wasn’t that easy   You can now connect any wifi supporting device to your PC/laptop as if it was connecting to a router!
You can also restrict access to internet to particular clients.

Google Launches a Spy-Free Gmail through Emails' Encryption


undefined
By The CoolAge Reporter From Buzz@Bangalore, Bangalore In a bid to stop snooping on its users, Google has overhauled its Gmail service in a big way - encrypting every single email you send or receive. According to the firm, "this ensures that your messages are safe not only when they move between you and Gmail's servers, but also as they move between Google's data centres", said the firm. Gmail now always uses an encrypted HTTPS connection when you check or send email and it can not be turned off. "No one can listen in on your messages as they go back and forth between you and Gmail's servers," the firm said in a press release. Your email is important to you and making sure it stays safe and always available is important to us, said Google. As you go about your day reading, writing and checking messages, there are tonnes of security measures running behind the scenes to keep your email safe, secure, and there whenever you need it, said the firm officials. The effort is in the wake of the revelations made last year when National Security Agency (NSA) whistle-blower Edward Snowden told the world that the NSA had access to Google's servers. According to Google, new change means that no one can listen in on your messages no matter if you are using public WiFi or logging in from your computer, phone or tablet. Want to write for us? Please click here

పీసీ..మ్యాక్‌..ఓ యూజర్‌!


మోడల్‌ ఏదైనా... కాన్ఫిగరేషన్‌ ఎంతైనా... వాడకంలో బ్యాలెన్స్‌ లేకపోతే ప్రయోజనం శూన్యం. అవసరానికి తగిన సాఫ్ట్‌వేర్‌లను ఓపిగ్గా వెతకాలి. ఇన్‌స్టాల్‌ చేయాలి. వాడి చూడాలి. అబ్బే... మాకంత సమయం ఎక్కడిదీ? అనే కోవకి వచ్చే వారి కోసమే ఇవి. వాడితే రెండిటినీ ఇట్టే బ్యాలెన్స్‌ చేయవచ్చు!ఏవైనా ఫైల్స్‌ని కాపీ చేయడానికి 'కాపీ' ఆప్షన్ని వాడడం తెలుసు. ఇలా కాపీ చేస్తున్న సందర్భాల్లో కొన్ని సందేహాలు వస్తుంటాయి. ఉదాహరణకు కాపీ చేస్తున్నప్పుడు మధ్యలో 'పాజ్‌' చేయడం ఎలా? అలాగే, అక్కర్లేని ఫైల్స్‌ని కాపీ అవుతున్నప్పుడు 'స్కిప్‌' చేయవచ్చా?... అలాంటివి అనేకం. వీటికి సమాధానంగా 'ఆల్ట్రాకాపీయర్‌' టూల్‌ని వాడొచ్చు. ఇన్‌స్టాల్‌ చేయగానే సిస్టం ట్రేలో చేరి పని చేస్తుంది. ఫైల్స్‌ని కాపీ చేయడానికి ఆప్షన్‌తో కాపీ చేయవచ్చు. కావాలంటే లింక్‌లోకి వెళ్లండి.సిస్టం సామర్థ్యం మందగిస్తే 'టెంపరరీ ఫైల్స్‌' తొలగిస్తుంటాం. అందుకు రన్‌లోకి వెళ్లి ఏవేవో కమాండ్స్‌ వాడుతుంటారు. అవేం లేకుండా సిస్టంలో దాగి ఉన్న టెంపరరీ ఫైల్స్‌ని ఈ టూల్‌ తొలగిస్తుంది. జిప్‌ ఫార్మెట్‌లో డౌన్‌లోడ్‌ చేసుకుని ఎక్స్‌ట్రాక్ట్‌ చేయాలి. టూల్‌ని రన్‌ చేసేందుకు 'డాట్‌నెట్‌ ఫ్రెమ్‌వర్క్‌ 4.0' అప్లికేషన్‌ సిస్టంలో ఉండాలి. నెట్‌లో వాడే సర్వీసులు అనేకం. అన్నింటి లాగిన్‌ వివరాల్ని గుర్తుంచుకోవడం కాస్త కష్టమే. అందుకు ఈ టూల్‌తో లాగిన్‌ తాళాల్ని సురక్షితంగా భద్రం చేయవచ్చు. కావాల్సినప్పుడు అనువుగా వాడుకోవచ్చు. ఇదో ఓపెన్‌సోర్స్‌ పాస్‌వర్డ్‌ మేనేజర్‌. అన్ని పాస్‌వర్డ్‌లను ఒక్క మాస్టర్‌ పాస్‌వర్డ్‌తో భద్రం చేయవచ్చు. అంటే... క్రియేట్‌ చేసుకున్న అన్ని పాస్‌వర్డ్‌ల డేటాబేస్‌కి తాళం మాస్టర్‌ పాస్‌వర్డ్‌ అన్నమాట. ఫోల్డర్‌ ఐకాన్స్‌ అన్నీ ఒకే రంగులో ఉంటాయి. కానీ, ముఖ్యమైన ఫోల్డర్ల రంగులు మార్చుకుని వాటి ప్రాధాన్యాన్ని తెలిపేలా సెట్‌ చేసుకుంటే? అందుకు అనువైన టూల్‌ ఇదే. జిప్‌ ఫార్మెట్‌లో డౌన్‌లోడ్‌ చేసుకుని ఎక్స్‌ట్రాక్ట్‌ చేయాలి. ఇన్‌స్టాల్‌ చేశాక రంగు మార్చాలనుకునే ఫోల్డర్‌పై రైట్‌క్లిక్‌ చేయాలి. వచ్చిన పాప్‌అప్‌ మెనూలో 'రెయిన్‌బో' ఆప్షన్‌ సెలెక్ట్‌ చేసి కావాల్సిన రంగుని ఎంపిక చేసుకోవచ్చు. మీరు ఎక్స్‌పీ వాడుతున్నట్లయితే ఫోల్డర్‌ స్టెల్‌ని 'విస్టా' మోడల్‌లో సెట్‌ చేసుకోవచ్చు. మొత్తం ప్రక్రియ ముగిశాక ఆప్షన్‌పై క్లిక్‌ చేయాలి. ఒకవేళ ఫోల్డర్‌ రంగుని తొలగించాలి అనుకుంటే ఉంది. టూల్‌ డౌన్‌లోడ్‌ కోసం లింక్‌లోకి వెళ్లండి.ఎక్కువ మెమొరీ తీసుకోకూడదు. కానీ, దాంట్లో అలారం సౌకర్యం ఉండాలి. పుట్టిన రోజు లాంటి ముఖ్యమైన వాటిని గుర్తు చేయాలి. డైరీ రాసుకోవాలి. అడ్రస్‌లను భద్రం చేసుకోవాలి. టైమర్‌ కౌంట్‌డౌన్‌ లాంటి మరిన్ని సౌకర్యాల్ని వాడుకోగలగాలి. అదీ ఉచితంగా... ఇలా ఎప్పుడైనా అనుకున్నారా? అయితే ఈ టూల్‌ మీకే. ఇన్‌స్టాల్‌ చేయగానే డెస్క్‌టాప్‌పై ఐకాన్‌ గుర్తు వస్తుంది. ఆప్షన్‌తో పీసీలో అలారం సెట్‌ చేయవచ్చు. ద్వారా పీసీని నిర్ణీత సమయానికి షట్‌డౌన్‌ చేయవచ్చు. పేరు, మొబైల్‌ నెంబర్‌, ఈమెయిల్‌, పర్సనల్‌ ఇన్ఫర్మేషన్‌... వివరాలతో 'అడ్రస్‌బుక్‌' క్రియేట్‌ చేయవచ్చు. మ్యాక్‌లో మాదిరిగా పీసీలోనూ 'డాకింగ్‌' బార్‌ని సెట్‌ చేసుకోవచ్చు. తెరకి అన్ని వైపులా డాక్‌బార్‌ని సెట్‌ చేసుకోవచ్చు. డాక్‌బార్‌లో కొత్త అప్లికేషన్‌ని ఇన్‌సర్ట్‌ చేయాలంటే... డ్రాగ్‌ అండ్‌ డ్రాప్‌ పద్ధతిలో చేయవచ్చు. డాక్‌బార్‌ యానిమేషన్‌ ఎఫెక్ట్‌ని కావాల్సినట్టుగా మార్చుకోవచ్చు. అందుకు మెనూలోకి వెళ్లండి. బార్‌ని ఆటోమాటిక్‌గా హైడ్‌ చేయవచ్చు కూడా. ఆండ్రాయిడ్‌ స్మార్ట్‌ మొబైల్‌ని పీసీకి కనెక్ట్‌ చేసి డేటాని ట్రాన్‌ఫర్‌ చేయడం సులువే. అదే మ్యాక్‌కి కనెక్ట్‌ చేస్తే! ఎలాంటి స్పందనా ఉండదు. అదే ఈ 'ఆండ్రాయిడ్‌ ఫైల్‌ ట్రాన్స్‌ఫర్‌' టూల్‌తో సులువుగా మ్యాక్‌కి మొబైల్‌ని కనెక్ట్‌ చేసి వాడుకోవచ్చు. టూల్‌ని మ్యాక్‌లో ఇన్‌స్టాల్‌ చేసి ఫోన్‌కి కనెక్ట్‌ చేస్తే పాప్‌అప్‌ ద్వారా కనిపిస్తుంది. ఇక మైక్రోఎస్‌డీ కార్డ్‌ని యాక్సెస్‌ చేసి డేటాని ట్రాన్స్‌ఫర్‌ చేయవచ్చు. డ్రాగ్‌ అండ్‌ డ్రాప్‌ పద్ధతిలోనూ ఫైల్స్‌ని కాపీ చేసుకునే వీలుంది. కావాలంటే లింక్‌లోకి వెళ్లండి.మ్యాక్‌ సామర్థ్యం కాస్త నెమ్మదిస్తే! టూల్‌తో స్టార్ట్‌అప్‌లో ఏమేం రన్‌ అవుతున్నాయో తెలుసుకుని మేనేజ్‌ చేయవచ్చు. ఇదో మల్టీ ఫంక్షన్‌ యుటిలిటీ టూల్‌. సిస్టం ఫైల్స్‌ని స్కాన్‌ చేసి చూడొచ్చు. అక్కర్లేని చెత్తని తొలగించి వేగాన్ని పెంచుతుంది. మెమొరీ డిలీట్‌ చేస్తుంది. మ్యాక్‌లో ఫైల్స్‌ని ఎప్పుడూ ఒకేలా వెతికి బోర్‌ అనిపిస్తే ఈ టూల్‌ని ప్రయత్నించండి. సరికొత్త సౌకర్యాల్ని మ్యాక్‌ ఓఎస్‌ని జత చేయవచ్చు. ఉదాహరణకు ఫైల్స్‌ని బ్రౌజ్‌ చేసేప్పుడు బ్రౌజర్‌లో మాదిరిగా ట్యాబ్‌ విండోలను సెలెక్ట్‌ చేసుకునే వీలుంది. రెండు విండోలను జోడుగా 'డ్యూయల్‌ ప్యానల్‌, డ్యూయల్‌ విండో'ల్లో ఫైల్స్‌ని బ్రౌజ్‌ చేయవచ్చు. విండోస్‌లో మాదిరిగా ఫైల్స్‌ని కట్‌, కాపీ చేసుకునే వీలుంది. ఏదైనా ఫోల్డర్‌ని సెలెక్ట్‌ చేసుకుని దాని 'పాత్‌'ని కాపీ చేయవచ్చు. అందుకు ఉంది. డెస్క్‌టాప్‌ మొత్తాన్ని మాయం చేయవచ్చు. లాంటి ఆప్షన్లు మరిన్ని ఉన్నాయి. టూల్‌ కోసం లింక్‌ చూడండి.ఎక్కువ సమయం మ్యాక్‌ ముందే గడుపుతున్నారా? అయితే, కళ్లకు అసౌకర్యం కలగకుండా టూల్‌ని వాడుకోవచ్చు. ప్రాపర్టీలను ఆటోమాటిక్‌గా మార్పులు చేస్తుంది. రోజులోని వేళల్ని అందుకు కొలమానంగా తీసుకుంటుంది. ఉదాహరణకు రాత్రి సమయంలో పూర్తిగా విద్యుత్‌ దీపాల్లో పని చేస్తుంటాం. అలాంటి సందర్భాల్లో మ్యాక్‌ డిస్‌ప్లేని కళ్లకు అనువుగా మార్పులు చేస్తుంది. డౌన్‌లోడ్‌, ఇతర వివరాలకు లింక్‌లోకి వెళ్లండి.మ్యాక్‌లో ఎక్కువగా వాడే అప్లికేషన్లు సులువుగా పొందేందుకు ఇదో చక్కని వేదిక. కావాల్సిన ఫైల్స్‌ని కూడా దీన్నుంచే వెతకొచ్చు. మరింత వేగంగా వేతికేందుకు హాట్‌కీస్‌, కీవర్డ్స్‌ని కూడా పెట్టుకునే వీలుంది. ఒకటి కంటే ఎక్కువ మ్యాక్‌ల్లో వాడాల్సివస్తే 'డ్రాప్‌బాక్స్‌' క్లౌడ్‌స్టోరేజ్‌ సర్వీసు ద్వారా సెట్టింగ్స్‌ని సింక్‌ చేసుకోవచ్చు. టూల్‌ కోసం లింక్‌ని చూడండి.మ్యాక్‌ కాన్ఫిగరేషన్‌ ఏంటో తెలుసుకునేందుకు అనువైంది. మొత్తం (సీపీయూ, ర్యామ్‌, హార్డ్‌డిస్క్‌, నెట్‌వర్క్‌ యూసేజ్‌...) సమాచారాన్ని మెనూబార్‌లోనే చూపిస్తుంది. ఇతర వివరాలకు లింక్‌లోకి వెళ్లండి.జిప్‌ చేసిన ఫైల్స్‌ని మ్యాక్‌లో ఎక్స్‌ట్రాక్ట్‌ చేసేందుకు వాడొచ్చు. లాంటి ఇతర ఫార్మెట్‌లనూ సపోర్ట్‌ చేస్తుంది. మ్యాక్‌ ఆప్‌ స్టోర్‌ నుంచే టూల్‌ డౌన్‌లోడ్‌ చేసుకోవచ్చు.


Firfox Tips ....! ఫైర్‌ఫాక్స్‌ జిత్తులు

మరింత అనువుగా పనిని చేయడం ఎలా?... ఇదో ప్రశ్న. నిత్యం పీసీతో పని చేసే వారి మదిలో మెదులుతూనే ఉంటుంది. వాడుతున్న సాఫ్ట్‌వేర్‌లపై ఏవేవో ప్రయోగాలు చేస్తుంటారు. దగ్గరి దార్లు వెతుకుతుంటారు. ఈ నేపథ్యంలో ఫైర్‌ఫాక్స్‌ వాడే యూజర్లు అనేక చిట్కాల్ని ప్రయత్నించొచ్చు. నచ్చిన వాటిని బ్రౌజర్‌కి జత చేసుకుని వాడుకోవచ్చు. ఉదాహరణకు ఏవైనా వెబ్‌ సర్వీసుల్ని తెరపై కావాల్సిట్టుగా సెట్‌ చేసుకుని అన్నింటినీ ఒకేసారి చూస్తూ పని చేసుకోవచ్చు. అందుకో ప్రత్యేక యాడ్‌ఆన్‌ సిద్ధంగా ఉంది. యూట్యూబ్‌లో వీడియోలు చూసేప్పుడు ఆటోమాటిక్‌గానే హైక్వాలీటీ వీడియోలు ఓపెన్‌ అవుతాయి. ఇలా చెప్పాలంటే చాలానే ఉన్నాయి. అవేంటో కాస్త వివరంగా తెలుసుకుందాం!ఇంట్లో ఉన్నప్పుడు కొన్ని సార్లు జీమెయిల్‌, ఫేస్‌బుక్‌ని ఒకేసారి చూడాలనుకుంటాం. రెండిటిలోని స్నేహితులతో ఒకేసారి ఛాట్‌ చేయడానికి వీలుపడుతుందేమో అని ప్రయత్నిస్తాం. కొంత మంది విజయం సాధించి ఉంటారు. కానీ, అది క్లిష్టమైన ప్రక్రియే. చాలా సులువుగా ఒకటి కంటే ఎక్కువ ట్యాబ్‌లను తెరపై ఒకేసారి చూస్తూ పని చేసేందుకు అనువైన యాడ్‌ఆన్‌ ఒకటుంది. అదే ఫైర్‌ఫాక్స్‌ యాడ్‌ఆన్స్‌ స్టోర్‌ నుంచి పొందొచ్చు. రౌజర్‌కి యాడ్‌ చేయగానే అడ్రస్‌బార్‌ పక్కనే అదనపు ఐకాన్‌ గుర్తు కనిపిస్తుంది. పక్కనే ఉన్న పాయింటర్‌పై క్లిక్‌ చేసి ఓపెన్‌ చేసిన ట్యాబ్‌ విండోలోను కావాల్సినట్టుగా తెరపై సెట్‌ చేసుకోవచ్చు. అందుకు మెనూలో వివిధ రకాల 'ట్యాబ్‌ లేఅవుట్స్‌' ఉన్నాయి. ట్యాబ్‌లను తెరకు నిలువు, అడ్డంగా పెట్టుకునే వీలుంది. ఒకవేళ ఓపెన్‌ చేసిన అన్ని ట్యాబ్‌లను నిలువుగా సెట్‌ చేసుకునేందుకుసెలెక్ట్‌ చేసుకోవాలి. ఒకవేళ లేఅవుట్‌ అక్కర్లేదు అనుకుంటే మెనూలోకి వెళ్లి 'క్లోజ్‌ లేవుట్‌'పై క్లిక్‌ చేయాలి. 'ఆప్షన్స్‌'ని మార్చుకుని ట్యాబ్‌ లేఅవుట్‌లో మార్పులు చేసుకునే వీలుంది. ఖాళీ దొరికితే టీవీ ఛానల్స్‌ చూస్తామో లేదో తెలియదుగానీ... యూట్యూబ్‌ ఛానల్‌ని తప్పక ఓపెన్‌ చేస్తాం. మీకు తెలుసుగా? యూట్యూబ్‌లో ఏదైనా వీడియోని ఓపెన్‌ చేస్తే డీఫాల్ట్‌గా మీడియం క్వాలిటీతో ప్లే అవుతుంది. తర్వాత ఒకవేళ హెచ్‌డీ క్వాలిటీలో చూడాలనుకుంటే సెట్టింగ్స్‌లోకి వెళ్లి పిక్సల్స్‌ క్వాలిటీని మార్చుకోవాలి. ఇవేం లేకుండా ఒక బుల్లి యాడ్‌ఆన్‌తో యూట్యూబ్‌ వీడియో క్వాలిటీని కావాల్సినట్టుగా మార్చుకోవచ్చు. ఎక్స్‌టెన్షన్ని బ్రౌజర్‌కి యాడ్‌ చేయగానే టూల్‌బార్‌లో లోగో కనిపిస్తుంది. ఇక మీదట యూట్యూబ్‌లో వీడియోని ఓపెన్‌ చేస్తే హెచ్‌డీ క్వాలిటీతో ఓపెన్‌ అవుతుంది. ఇక టూల్‌బార్‌లోని మెనూ ద్వారా మరింత అనువుగా వీడియోని చూడొచ్చు. ప్లే అవుతున్న వీడియోని తెరపై పెద్దగా చూడలంటే... మెనూలోని ఆప్షన్ని సెలెక్ట్‌ చేయండి. 'ఫుల్‌స్క్రీన్‌'లో చూసేందుకు వీడియోపై డబుల్‌క్లిక్‌ చేయాలి. నెట్‌ కనెక్షన్‌ స్పీడ్‌ ఆధారంగా వీడియో క్వాలిటీని నుంచి కి సెట్‌ చేయవచ్చు. ఆలస్యం దేనికి లింక్‌లోకి వెళ్లండి. బ్రౌజింగ్‌ హిస్టరీగానీ, ఎలాంటి కీవర్డ్స్‌గానీ ఇతరుల కంట పడకూడదు అనుకుంటే ప్రైవేటు బ్రౌజింగ్‌ చేస్తుంటాం. అందుకు బ్రౌజర్‌లోనే 'ప్రైవేటు విండో' ఆప్షన్‌ ఉంది. దాన్ని ఎంపిక చేసుకుంటే ఏకంగా బ్రౌజర్‌ మరో కొత్త విండోలో ఓపెన్‌ అవుతుంది. అలాకాకుండా అన్ని ట్యాబ్‌ల మాదిరిగానే ప్రైవేటు బ్రౌజింగ్‌ కోసం 'ప్రైైెవేటు ట్యాబ్‌'ని ఓపెన్‌ చేసుకుంటే? అందుకు మార్గమే యాడ్‌ఆన్‌. బ్రౌజర్‌ని యాడ్‌ చేశాక రీస్టార్ట్‌ చేయక్కర్లేదు.బ్రౌజర్‌లోని ఫైల్‌ మెనూలోకి వెళ్తే అదనంగా 'న్యూ ప్రైవేట్‌ ట్యాబ్‌' మెనూ కనిపిస్తుంది. క్లిక్‌ చేస్తే సరి. ఒకవేళ షార్ట్‌కట్‌తో ఓపెన్‌ చేద్దాం అనుకుంటే మీటల్ని కలిపి నొక్కండి. యాడ్‌ఆన్‌ కోసం లింక్‌లోకి వెళ్లండి. వెబ్‌ విహారంలో కావాల్సిన కొన్ని వెబ్‌ పేజీలను ప్రింట్‌లు తీస్తుంటాం. కానీ, పేజీల్లో అక్కర్లేని కంటెంట్‌ ఉంటుంది. అలాగే, ప్రింట్‌లు తీస్తే ప్రింటర్‌ క్యాట్రిడ్జ్‌ వృథానే కదా! మరి, దీనికి పరిష్కారం లేదనుకోవద్దు. అందుకో ప్రత్యేక యాడ్‌ఆన్‌ ఉంది. కావాలంటే ప్రయత్నించండి. బ్రౌజర్‌కి యాడ్‌ చేయగానే టూల్‌బార్‌లో ప్రత్యేక ఐకాన్‌ గుర్తు కనిపిస్తుంది. ఇక మీరు ఏదైనా వెబ్‌ పేజీని ప్రింట్‌ తీయాలనిపిస్తే అదే పేజీలో ఉండి 'ప్రింట్‌ ఎడిట్‌' గుర్తుపై క్లిక్‌ చేసి పేజీ మొత్తం ప్రివ్యూ కనిపిస్తుంది. ఇక పాయింటర్‌తో అక్కర్లేని వాటిని డిలీట్‌ చేయవచ్చు. సెలెక్ట్‌ చేసేందుకు మౌస్‌తో డ్రాగ్‌ చేయాలి. డిలీట్‌ చేయడం ఎందుకు అనుకుంటే చేయవచ్చు. టెక్స్ట్‌కి ఉన్న ఫార్మెట్స్‌ని తీసేందుకు 'ఫార్మెట్‌' మెనూలోకి వెళ్లండి. పొరబాటున డిలీట్‌ చేస్తే చేసుకునే వీలుంది. యాడ్‌ఆన్‌ని ప్రయత్నించాలనుకుంటే లింక్‌లోకి వెళ్లండి. ఇంట్లో తాతయ్యకు బ్రౌజర్‌ మెనూలు కనిపించడం లేదా? డీఫాల్ట్‌గా ఉన్న ఫాంట్‌ చదివేందుకు అనువుగా లేదా? అయితే మార్చేయండి. అదెలా సాధ్యం? అందుకు తగిన యాడ్‌ఆన్‌ సిద్ధంగా ఉంది. అదే బ్రౌజర్‌కి యాడ్‌ చేసి రీస్టార్ట్‌ చేయాలి. ఇప్పుడు టూల్‌బార్‌లో ఐకాన్‌ గుర్తు కనిపిస్తుంది. దానిపై క్లిక్‌ చేసి ఫాంట్‌ మెనూలోని ఉన్న ఫాంట్‌ స్త్టెల్‌ సెలెక్ట్‌ చేయగానే బ్రౌజర్‌లో మారిపోతుంది. అలాగే, సైజు మెనూ ద్వారా మెనూల్లోని టెక్స్ట్‌ పరిమాణాన్ని పెంచుకునే వీలుంది. టెక్స్ట్‌ రంగు, బ్యాక్‌గ్రౌండ్‌ని కూడా మార్చుకునే వీలుంది. అక్కర్లేదు అనుకుంటే తిరిగి 'నార్మట్‌' సెట్టింగ్స్‌ని మార్చుకోవచ్చు. కొన్ని సైట్‌ల్లో రైట్‌క్లిక్‌ని కట్టడి చేస్తుంటారు. టెక్స్ట్‌ని సెలెక్ట్‌ చేయడానికి వీలు పడదు. రైట్‌క్లిక్‌ చేసి కాపీ, పేస్ట్‌ ఆప్షన్లను యాక్సెస్‌ చేయడం సాధ్యపడదు. అలాంటి సందర్భాల్లో ఏం చేయాలి? రైట్‌క్లిక్‌ని వాడలేమా? ఏం కాదు... ఎక్స్‌టెన్షన్‌తో చిటికెలో సాధ్యం. కావాలంటే లింక్‌లోకి వెళ్లండి. బ్రౌజర్‌ స్టార్ట్‌ పేజీలోనే స్పీడ్‌ డయల్‌ ట్యాబ్‌లతో పాటు బుక్‌మార్క్‌లను సింక్రనైజ్‌ చేసుకుని మేనేజ్‌ చేసుకునేందుకు ఎక్స్‌టెన్షన్ని వాడొచ్చు. మీ ఫొటోలను పేజీ బ్యాక్‌గ్రౌండ్‌గా పెట్టుకోవచ్చు. బ్రౌజర్‌ ఎడిట్‌ మెనూలోని 'కాపీ' ఆప్షన్‌తో కాపీ చేస్తే టెక్స్ట్‌కి ఉన్న అన్ని ఫార్మెట్‌లూ కాపీ అవుతాయి. అలా కాకుండా వెబ్‌ పేజీల్లోని టెక్స్ట్‌ మేటర్‌ని ఎలాంటి ఫార్మెట్‌లు అప్లె కాకుండా కాపీ చేయవచ్చు. అందుకు ఎక్స్‌టెన్షన్‌ని ఫైర్‌ఫాక్స్‌కి యాడ్‌ చేయండి. తర్వాత ఎడిట్‌ మెనూలోకి వెళ్లి చూస్తే ఆప్షన్‌ కనిపిస్తుంది. షార్ట్‌కట్‌ ద్వారా చేయాలంటే మీటల్ని వాడొచ్చు. ఓపెన్‌ చేసి ఉన్న ట్యాబ్‌ల్లోకి వెళ్లకుండానే ప్రివ్యూ చూడొచ్చా? యాడ్‌ఆన్‌తో చూడొచ్చు. దీన్ని బ్రౌజర్‌కి జత చేసిన తర్వాత పాయింటర్‌ని ట్యాబ్‌పై ఉంచగానే అక్కడే 'పాప్‌అప్‌' మెనూ మాదిరిగా ప్రివ్యూ విండో కనిపిస్తుంది. విండోపై రైట్‌క్లిక్‌ చేస్తే జూమ్‌ అవుతుంది కూడా. ప్రివ్యూ విండో నుంచే ట్యాబ్‌ని 'రీఫ్రెష్‌' చేయవచ్చు. బ్రౌజర్‌లోని మెమొరీని ఒకే క్లిక్కుతో తొలగించొచ్చు. అందుకు బటన్‌ని వాడొచ్చు. బ్రౌజర్‌ని జత చేయగానే ఐకాన్‌ గుర్తు కనిపిస్తుంది. దానిపై క్లిక్‌ చేస్తే సరి.


Gmail Tips ... ! జీమెయిల్‌ జిలుగులు!


విద్యార్థులు... ఉద్యోగులు... వ్యాపారులు... ఎవరికైనా... జీమెయిల్‌ అనివార్యమే! ఏదో వాడడం కాదు! ఇలా వాడితే అదనంగా ప్రయోజనాలు ఎన్నో!ట్టింట్లో ఏది చేయాలన్నా... గూగుల్‌ గుమ్మం దాటాల్సిందే. అందుకు జీమెయిల్‌ ఎకౌంట్‌ గేట్‌పాస్‌. మెయిళ్లు పంపుతాం. గూగుల్‌ ప్లస్‌కి అనుసంధానం అవుతాం. యూట్యూబ్‌లోకి వెళతాం. ఇంకా చెప్పాలంటే.. గూగుల్‌ డ్రైవ్‌ని వాడుకుంటాం. ఇదంతా తెలిసిందే. జీమెయిల్‌ ఐడీతో ఇంకా చాలానే చేయవచ్చు. డ్రైవ్‌లో బ్యాక్‌అప్‌ చేసుకున్న మ్యూజిక్‌ ట్రాక్స్‌ని అక్కడే వినొచ్చు. మీ ప్రింటర్‌కి అనుసంధానమై ఎక్కడి నుంచైనా ప్రింట్‌లు ఇవ్వొచ్చు. యూట్యూబ్‌ ఛానల్‌ని నిర్వహించొచ్చు. ఇంకా చాలానే చేవయచ్చు. అవేంటో వివరంగా తెలుసుకుందాం!గూగుల్‌ డ్రైవ్‌ అంటే క్లౌడ్‌ స్టోరేజ్‌ సర్వీసని... దాంట్లో అందిస్తున్న ఉచిత స్పేస్‌లో డాక్యుమెంట్‌లు, ప్రజంటేషన్స్‌, స్ప్రెడ్‌షీట్‌లు, ఫొటోలు... భద్రం చేసుకోవచ్చనీ.. వాటిని గూగుల్‌ డాక్స్‌తో ఎప్పుడైనా ఎడిట్‌ చేసుకోవచ్చనీ తెలుసా? అలాగే దాంట్లోకి మీకు ఇష్టమైన పాటల్ని అప్‌లోడ్‌ చేసుకుని వినొచ్చని తెలుసా? అందుకో థర్డ్‌పార్టీ సర్వీసు ఉంది. అయితే, గూగుల్‌ క్రోమ్‌ బ్రౌజర్‌లో సైట్‌ని ఓపెన్‌ చేయండి. జీమెయిల్‌తో లాగిన్‌ అయ్యి చేయాలి. దీంతో గూగుల్‌ డ్రైవ్‌లో అప్‌లోడ్‌ చేసిన అన్ని పాటలు జాబితాగా కనిపిస్తాయి. ఎప్పుడైనా... ఎక్కడైనా మీ మ్యూజిక్‌ లైబ్రరీని వినొచ్చు. ఎంపీ3, ఎంపీ4 ఫైల్స్‌ని సపోర్ట్‌ చేస్తుంది. నెట్‌ కనెక్షన్‌ ఉన్న ఏ సిస్టంలోనైనా ట్రాక్స్‌ని వినొచ్చు. ఒకవేళ మొబైల్‌లో వినాలనుకుంటే? అందుకు తగిన ఆప్స్‌ ఉన్నాయి. ఆండ్రాయిడ్‌ మొబైల్‌ వాడుతున్నట్లయితే ఆప్‌ని వాడొచ్చు. గూగుల్‌ డ్రైవ్‌తో పాటు డ్రాప్‌బాక్స్‌, బాక్స్‌, షుగర్‌సింక్‌, స్కైడ్రైవ్‌, అమెజాన్‌ ఎస్‌3... క్లౌడ్‌స్టోరేజ్‌లను సపోర్ట్‌ చేస్తుంది. అంటే ఆయా క్లౌడ్‌స్టోరేజ్‌ల్లో భద్రం చేసుకున్న మ్యూజిక్‌ ట్రాక్స్‌ని వినొచ్చన్నమాట. యాపిల్‌ యూజర్లు ఆప్‌ని వాడొచ్చు. మీకు తెలుసా? ప్రపంచంలో ఎక్కడి నుంచైనా ఇంట్లోని ప్రింటర్‌ని యాక్సెస్‌ చేయవచ్చు. అందుకు గూగుల్‌ క్రోమ్‌ బ్రౌజర్‌ని వాడాలి. జీమెయిల్‌తో లాగిన్‌ అయ్యి ఇంట్లోని ప్రింటర్‌కి ప్రింట్‌ ఇవ్వొచ్చు. ముందుగా ఇంట్లోని ప్రింటర్‌, పీసీ ఆన్‌లో ఉండాలి. ఇప్పుడు బ్రౌజర్‌ని ఓపెన్‌ చేసి 'సెట్టింగ్స్‌'లోకి వెళ్లాలి. వచ్చిన ట్యాబ్‌ విండోలోని మెనూలోని ఆప్షన్ని ఎంపిక చేసుకోవాలి. 'మేనేజ్‌'పైన క్లిక్‌ చేసి 'యాడ్‌ ప్రింటర్‌'తో వాడుతున్న ప్రింటర్‌ని జత చేయాలి. ఇక ఎక్కడినుంచైనా ప్రింట్‌ ఇవ్వాలనుకుంటే క్రోమ్‌ బ్రౌజర్‌లోని 'ప్రింట్‌'పై క్లిక్‌ చేసి ద్వారా రిమోట్‌ ప్రింటర్‌ని సెలెక్ట్‌ చేసుకుని ప్రింట్‌ ఇవ్వాలి. గుర్తుంచుకోవాల్సిన విషయం ఏంటంటే... బ్రౌజర్‌లోని కంటెంట్‌ని మాత్రమే ఇలా ప్రింట్‌ తీసుకోగలరు. సిస్టం సాఫ్ట్‌వేర్‌ల నుంచి ప్రింట్‌ ఇవ్వలేరు. ఒకవేళ వర్డ్‌ డాక్యుమెంట్స్‌ని ప్రింట్‌ తీసుకోవాల్సివస్తే 'గూగుల్‌ డాక్స్‌'లోకి అప్‌లోడ్‌ చేసుకుని 'ఆఫీస్‌' ఫైల్స్‌ని ప్రింట్‌ తీసుకోవచ్చు.ఇదే సౌకర్యాన్ని మొబైల్‌ నుంచి కూడా వాడుకోవచ్చు. అందుకు తగిన ఆప్‌ కావాలంటే లింక్‌లోకి వెళ్లండి.ఐఫోన్‌ యూజర్లకు ప్రత్యేకం. మొబైల్‌లో ఎన్నో కాంటాక్ట్‌లను సేవ్‌ చేస్తుంటాం. అనుకోకుండా మొబైల్‌ పోయినా... కొత్త మొబైల్‌కి అప్‌డేట్‌ అవ్వాల్సివచ్చినా... కాంటాక్ట్‌లను మేనేజ్‌ చేసుకోవడం కొంచెం క్లిష్టమైన ప్రక్రియే. కానీ, జీమెయిల్‌లోని 'కాంటాక్ట్‌'లతో చిటికెలో మొబైల్‌లోకి సింక్‌ చేయవచ్చు. అందుకు జీమెయిల్‌ హోం పేజీలోని ఎడమవైపు కనిపించే పక్కన బాణం గుర్తుపై క్లిక్‌ చేసి 'కాంటాక్ట్‌'ను ఎంపిక చేసుకోవాలి. ఇక మొబైల్‌లోని అన్ని కాంటాక్ట్‌లను మాన్యువల్‌గా అడ్రస్‌బుక్‌లో యాడ్‌ చేయవచ్చు. ఒకవేళ ఫైల్‌ ఉన్నట్లయితే కాంటాక్ట్‌ ట్యాబ్‌లోని 'మోర్‌'పైన క్లిక్‌ చేసి ఇంపోర్ట్‌ చేసుకోవచ్చు. మొత్తం కాంటాక్ట్‌లను అడ్రస్‌బుక్‌లో పొందుపరిచాక 'మోర్‌'లోని పై క్లిక్‌ చేసి ఫార్మెట్‌ల్లో సేవ్‌ సేవ్‌ చేయవచ్చు. ఇక ఎప్పుడైనా మొబైల్‌లోకి కాంటాక్ట్‌లను సింక్‌ చేసుకోవాలంటే గూగుల్‌ ఎకౌంట్‌తో మొబైల్‌లోకి లాగిన్‌ అవ్వగానే మొత్తం కాంటాక్ట్‌లు సింక్‌ అవుతాయి. ఆండ్రాయిడ్‌, బ్లాక్‌బెర్రీ, ఐఓఎస్‌, విండోస్‌ ఫోన్‌... వాడేది ఏ ఫ్లాట్‌ఫాం అయినా కాంటాక్ట్‌లను సింక్‌ చేయవచ్చు.మీకున్న క్రియేటివ్‌ స్కీల్స్‌తో యూట్యూబ్‌లో ఓ ఛానల్‌ ఓపెన్‌ చేయవచ్చు. అందుకో వెబ్‌ కెమెరా, మైక్రోఫోన్‌ ఉంటే చాలు. జీమెయిల్‌ ఐడీనే గేట్‌పాస్‌గా చేసుకుని ఛానల్‌ని ప్రారంభించొచ్చు. యూట్యూబ్‌ హోం పేజీలోని 'మై ఛానల్స్‌'లోకి వెళ్లి ఛానల్‌ పేరు ఎంటర్‌ చేయాలి. 'అప్‌లోడ్‌'పై క్లిక్‌ చేసి రికార్డ్‌ చేసిన వీడియోలు అప్‌లోడ్‌ చేసి షేర్‌ చేయవచ్చు. ఒకవేళ వెబ్‌ కెమెరాతో రికార్డ్‌ చేయాలనుకుంటే లోని 'రికార్డ్‌'పై క్లిక్‌ చేయాలి. రికార్డింగ్‌ పూర్తయ్యాక ప్రివ్యూ చూసి పబ్లిష్‌ చేయాలి. 'వీడియో మేనేజర్‌' విభాగంలోకి వెళ్లి వీడియోల సెట్టింగ్స్‌ని మార్చుకోవచ్చు. ఇతరుల కంట పడకూడదు అనుకుంటే 'ప్రైవేట్‌'గా సెట్‌ చేయాలి. 'వీడియో ఎడిటర్‌' ద్వారా యూట్యూబ్‌లోనే వీడియోలను ఎడిట్‌ చేసుకునే వీలుంది. ఇక సిస్టంలోని వీడియో ఫైల్స్‌ని పబ్లిష్‌ చేయాలంటే డ్రాగ్‌ అండ్‌ డ్రాప్‌ పద్ధతిలో అప్‌లోడ్‌ చేయవచ్చు.వాడుతున్న జీమెయిల్‌లో ఎంత స్పేస్‌ని అందిస్తున్నారో ఎప్పుడైనా విశ్లేషించారా? జీమెయిల్‌, గూగుల్‌ డ్రైవ్‌, గూగుల్‌ ప్లస్‌ సర్వీసులు ఎంతెంత మెమొరీ తీసుకున్నాయో చెక్‌ చేశారా? అదేమంత క్లిష్టమైన ప్రక్రియేం కాదు. మొత్తం 15 జీబీ ఉచితంగా అందిస్తున్నారు. వాడకం ఎలా ఉందో చూడాలంటే జీమెయిల్‌ పేజీ కిందిభాగంలో ఎడమవైపు పరిశీలిస్తే కనిపిస్తుంది. ఉదాహరణకు అని కనిపిస్తూ కిందే ఆప్షన్‌ ఉంటుంది. మరింత వివరంగా ఏయే సర్వీసు ఎంతెంత మెమొరీ ఖర్చు అయ్యిందో తెలుసుకోవాలంటే 'మేనేజ్‌'పై క్లిక్‌ చేయండి. ఛార్ట్‌ ద్వారా మెమొరీ వాడకాన్ని చూడొచ్చు. మరింత స్పేస్‌ కావాలనుకుంటే ప్రీమియం ఎకౌంట్‌ని కొనుగోలు చేయవచ్చు.ఆండ్రాయిడ్‌, ఐఓఎస్‌ మొబైల్‌ వాడుతున్నట్లయితే ఆప్‌తో ఫొటోలు, వీడియోలను బ్యాక్‌అప్‌ చేయవచ్చు. ఆప్‌ని ఇన్‌స్టాల్‌ చేశాక 'సెట్టింగ్స్‌'లోకి వెళ్లి ఆప్షన్ని ఎనేబుల్‌ చేయాలి. యాపిల్‌ యూజర్లు ఐట్యూన్స్‌ నుంచి పొందండి. జీమెయిల్‌లోని సెర్చ్‌ ద్వారా కావాల్సిన మెయిల్స్‌ని వెతకడం తెలిసిందే. మరింత నిశితంగా మెయిల్స్‌ ద్వారా వచ్చిన ఎటాచ్‌మెంట్‌ ఫైల్స్‌ని వెతకొచ్చని తెలుసా? అందుకు సెర్చ్‌ కీవర్డ్స్‌ ఉన్నాయి. ఉదాహరణకు మెయిల్‌ ఎటాచ్‌మెంట్స్‌లో 10ఎంబీ కంటే ఎక్కువ మెమొరీ తీసుకున్న మెయిల్స్‌ని వెతకాలంటే? సెర్చ్‌బాక్స్‌లో అని టైప్‌ చేసి ఎంటర్‌ చేస్తే చాలు. ఇదే 10 ఎంబీ సైజు ఉన్న ఎటాచ్‌మెంట్‌ ఫైల్స్‌ 6 నెలల ముందువి కావాలంటే? కీవర్డ్‌ వాడొచ్చు. ఉదాహరణకు ఇలా... సాఫ్ట్‌వేర్‌ల్లో మాదిరిగానే జీమెయిల్‌లోనూ షార్ట్‌కట్‌ మీటలు వాడుతున్నారా? అదెలా? అనేది మీ సమాధానం అయితే... మెయిల్‌లో వాడుకునేందుకు బోల్డన్ని షార్ట్‌కట్‌లు ఉన్నాయి. ఉదాహరణకు మెయిల్‌కి రిప్త్లె ఇవ్వాలంటే కీబోర్డ్‌లోని నొక్కితే సరి. మెయిల్‌లో ఏదైనా లింక్‌ని ఇన్‌సర్ట్‌ చేయాలంటే? సింపుల్‌గా నొక్కితే సరి. ఇలా జీమెయిల్‌లో వాడుకోదగిన షార్ట్‌కట్‌ మీటల్ని తెలుసుకునేందుకు నొక్కండి. మొత్తం జాబితా కనిపిస్తుంది. వాటి ఆధారంగా జీమెయిల్‌లోని పనుల్ని చిటికెలో చక్కబెట్టేయవచ్చు.ఇన్‌బాక్స్‌లోనే సోషల్‌ నెట్‌వర్క్‌ అప్‌డేట్స్‌ని మరింత స్మార్ట్‌ చూసేందుకు క్రోమ్‌ వెబ్‌ స్టోర్‌ నుంచి ఆప్‌ని వాడొచ్చు. క్రోమ్‌కి జత చేయగానే ఆప్‌లాంచర్‌లో కనిపిస్తుంది. రన్‌ చేసి ప్రత్యేక మెనూ, టూల్‌బార్‌తో సోషల్‌లైఫ్‌ని మరింత సులువుగా మేనేజ్‌ చేయవచ్చు. ఆప్‌ కోసం లింక్‌లోకి వెళ్లండి.మానంలో వెళ్తున్నప్పుడో... రైలు ప్రయాణంలోనో కొన్నిసార్లు ఎలాంటి నెట్‌వర్క్‌ కనెక్షన్‌ అందుబాటులో ఉండదు. అలాంటి సందర్భాల్లో ఆఫ్‌లైన్‌లో జీమెయిల్‌ని యాక్సెస్‌ చేసి పని చేయవచ్చు. అందుకో చిట్కా ఉంది. మీరు క్రోమ్‌ బ్రౌజర్‌ని వాడుతున్నట్లయితే 'క్రోమ్‌ వెబ్‌ స్టోర్‌' నుంచి ఆప్‌ని ఇన్‌స్టాల్‌ చేసుకోవాలి. సిస్టంలో అనుకునేరు. క్రోమ్‌ బ్రౌజర్‌లోనే! అందుకు లింక్‌లోకి వెళ్లండి. 'యాడ్‌'పైన క్లిక్‌ చేసి ఆప్‌ని క్రోమ్‌లో ఇన్‌స్టాల్‌ చేయాలి. యాప్‌లాంచర్‌లో వచ్చిన లోగోపై క్లిక్‌ చేసి ఆప్షన్ని చెక్‌ చేసి క్లిక్‌ చేయాలి. ఇక నెట్‌ కనెక్షన్‌ లేకున్నా మెయిల్స్‌ని యాక్సెస్‌ చేయవచ్చు.

Boost your Internet Speed without Software


Lots of booster software available on internet for download some are free and others are paid software’s. But in real nothing happened if you buy any boosting software and use it for boost your net speed. These software’s can improve your internet performance but not boost. Most of software’s works on Register tweaks  and TCP optimization. So you can do these all things without software’s by set some settings of Windows OS.
All Microsoft OS comes with 20% Bandwidth reservation for purpose of Windows updates and other important task related to internet. You can manually of this settings from Group Policy of Windows OS. After end this 20% reservation your internet speed must increase.
Steps for stop 20% Reserve Bandwidth:
1. Open Group Policy Editor by help of command “gpedit.msc” you can enter this command in RUN box (Start, and then Run).
gpedit
2. Now Navigate to Computer Configuration/Administrative Templates/Network/QOS Packet Scheduler.
3. See left side and and double click on “Limit reservable bandwidth”  or You can go with right click and select properties (In Windows XP).
4. Now click on enable radio button and then setting the Bandwidth Limit % to 0. It should look like the image below.
gpedit-1
5. Now just hits OK and you done.


Useful Run Commands for Windows

Tags:Useful Run Commands for Windows short commands windows  winxp commands  run commands windows xp  keyboard commands windows xp  chkdsk commands windows xp  netsh commands windows xp  windows xp commands pdf  windows xp commands list pdf

Do you use the Run feature in Windows XP?  For most, this feature remains unused (or rarely used).  Why is that?   Well, First off nearly all of the Run Commands Correspond to a particular Control Panel Item or a Utility, Tool or Task that can be accessed through Windows.    There are, however, tools and utilities that I bet you never knew you had that can be accessed through the Run feature.   The main reason most people don't use the Run feature is because they don't know the Commands.  So, to solve that problem, I decided to put together the following listing, which lists 99 Run Commands and what they correspond too...


To Access…Run Command
Accessibility Controls access.cpl
Accessibility Wizardaccwiz
Add Hardware Wizardhdwwiz.cpl
Add/Remove Programs appwiz.cpl
Administrative Toolscontrol admintools
Adobe Acrobat (if installed)acrobat
Adobe Designer (if installed)formdesigner
Adobe Distiller (if installed)acrodist
Adobe ImageReady (if installed)imageready
Adobe Photoshop (if installed)photoshop
Automatic Updateswuaucpl.cpl
Bluetooth Transfer Wizardfsquirt
Calculatorcalc
Certificate Managercertmgr.msc
Character Mapcharmap
Check Disk Utilitychkdsk
Clipboard Viewerclipbrd
Command Promptcmd
Component Servicesdcomcnfg
Computer Managementcompmgmt.msc
Control Panelcontrol
Date and Time Properties timedate.cpl
DDE Shares ddeshare
Device Managerdevmgmt.msc
Direct X Control Panel (if installed)*directx.cpl
Direct X Troubleshooterdxdiag
Disk Cleanup Utilitycleanmgr
Disk Defragmentdfrg.msc
Disk Managementdiskmgmt.msc
Disk Partition Managerdiskpart
Display Propertiescontrol desktop
Display Propertiesdesk.cpl
Display Properties (w/Appearance Tab Preselected)control color
Dr. Watson System Troubleshooting Utilitydrwtsn32
Driver Verifier Utilityverifier
Event Viewereventvwr.msc
Files and Settings Transfer Toolmigwiz
File Signature Verification Toolsigverif
Findfastfindfast.cpl
Firefox (if installed) firefox
Folders Propertiesfolders
Fontscontrol fonts
Fonts Folderfonts
Free Cell Card Gamefreecell
Game Controllers joy.cpl
Group Policy Editor (XP Prof)gpedit.msc
Hearts Card Gamemshearts
Help and Supporthelpctr
HyperTerminalhypertrm
Iexpress Wizardiexpress
Indexing Serviceciadv.msc
Internet Connection Wizardicwconn1
Internet Exploreriexplore
Internet Properties inetcpl.cpl
Internet Setup Wizardinetwiz
IP Configuration (Display Connection Configuration)ipconfig /all
IP Configuration (Display DNS Cache Contents)ipconfig /displaydns
IP Configuration (Delete DNS Cache Contents)ipconfig /flushdns
IP Configuration (Release All Connections)ipconfig /release
IP Configuration (Renew All Connections)ipconfig /renew
IP Configuration (Refreshes DHCP & Re-Registers DNS)ipconfig /registerdns
IP Configuration (Display DHCP Class ID)ipconfig /showclassid
IP Configuration (Modifies DHCP Class ID)ipconfig /setclassid
Java Control Panel (if installed)jpicpl32.cpl
Java Control Panel (if installed)javaws
Keyboard Propertiescontrol keyboard
Local Security Settingssecpol.msc
Local Users and Groupslusrmgr.msc
Logs You Out Of Windows logoff
Malicious Software Removal Tool mrt
Microsoft Access (if installed)msaccess
Microsoft Chatwinchat
Microsoft Excel (if installed)excel
Microsoft Frontpage (if installed)frontpg
Microsoft Movie Makermoviemk
Microsoft Paintmspaint
Microsoft Powerpoint (if installed)powerpnt
Microsoft Word (if installed)winword
Microsoft Syncronization Toolmobsync
Minesweeper Gamewinmine
Mouse Propertiescontrol mouse
Mouse Propertiesmain.cpl
Nero (if installed)nero
Netmeeting conf
Network Connectionscontrol netconnections
Network Connectionsncpa.cpl
Network Setup Wizardnetsetup.cpl
Notepadnotepad
Nview Desktop Manager (if installed)nvtuicpl.cpl
Object Packagerpackager
ODBC Data Source Administratorodbccp32.cpl
On Screen Keyboardosk
Opens AC3 Filter (if installed)ac3filter.cpl
Outlook Expressmsimn
Paintpbrush
Password Propertiespassword.cpl
Performance Monitorperfmon.msc
Performance Monitorperfmon
Phone and Modem Options telephon.cpl
Phone Dialerdialer
Pinball Gamepinball
Power Configuration powercfg.cpl
Printers and Faxescontrol printers
Printers Folderprinters
Private Character Editoreudcedit
Quicktime (If Installed)QuickTime.cpl
Quicktime Player (if installed)quicktimeplayer
Real Player (if installed)realplay
Regional Settings intl.cpl
Registry Editorregedit
Registry Editorregedit32
Remote Access Phonebookrasphone
Remote Desktop mstsc
Removable Storagentmsmgr.msc
Removable Storage Operator Requestsntmsoprq.msc
Resultant Set of Policy (XP Prof)rsop.msc
Scanners and Camerassticpl.cpl
Scheduled Taskscontrol schedtasks
Security Center wscui.cpl
Servicesservices.msc
Shared Foldersfsmgmt.msc
Shuts Down Windowsshutdown
Sounds and Audio mmsys.cpl
Spider Solitare Card Gamespider
SQL Client Configuration cliconfg
System Configuration Editorsysedit
System Configuration Utilitymsconfig
System File Checker Utility (Scan Immediately)sfc /scannow
System File Checker Utility (Scan Once At The Next Boot)sfc /scanonce
System File Checker Utility (Scan On Every Boot)sfc /scanboot
System File Checker Utility (Return Scan Setting To Default)sfc /revert
System File Checker Utility (Purge File Cache)sfc /purgecache
System File Checker Utility (Sets Cache Size to size x)sfc /cachesize=x
System Informationmsinfo32
System Properties sysdm.cpl
Task Managertaskmgr
TCP Testertcptest
Telnet Clienttelnet
Tweak UI (if installed)tweakui
User Account Managementnusrmgr.cpl
Utility Managerutilman
Windows Address Bookwab
Windows Address Book Import Utilitywabmig
Windows Backup Utility (if installed)ntbackup
Windows Explorerexplorer
Windows Firewallfirewall.cpl
Windows Magnifier magnify
Windows Management Infrastructurewmimgmt.msc
Windows Media Playerwmplayer
Windows Messengermsmsgs
Windows Picture Import Wizard (need camera connected)wiaacmgr
Windows System Security Toolsyskey
Windows Update Launcheswupdmgr
Windows Version (to show which version of windows)winver
Windows XP Tour Wizardtourstart
Wordpad write


Useful Command Prompt Commands Windows 7


  • Lock Windows quickly
    Whether you're at the office, library, or cafe, it's always a good idea to lock Windows before you step away. To lock Windows quickly, press Windows Logo+L.

  • Rename multiples files
    To rename multiple files in Windows, highlight the files you want to rename, then hit the F2 key. Rename the first file, then hit Enter. All your files will be renamed and a number in parenthesis will be added to the end of the name. If you change your mind, you can hit Ctrl+Z to undo the rename.
    Files to rename
    Original file names to rename.
    (Credit: Screenshot by Ed Rhee)
    Files renamed
    New file names.


  • Bypass the Windows splash screen
    Disabling the Windows splash screen can shave a couple seconds from your total boot time. Launch the Windows Run command (Windows Logo+R), then type msconfig. Under the Boot tab, check the box next to "No GUI boot." Hit the OK or Apply button to save the changes.
    Bypass Windows splash screen

  • Show hidden files, folders, and drives
    To view files, folders, and drives that Windows hides, open the Windows search box (Windows Logo) and type folder. Next, select Folder Options from the search list and navigate to the View tab. Under Hidden files and folders, check the box next to "Show hidden files, folders, and drives."
    Show hidden files

  • Enable underlining of keyboard shortcuts
    Windows has many menu shortcut keys, but they're hidden by default. To enable the underlining of the shortcuts, go to Control Panel > Ease of Access Center > Change how your keyboard works. Click on the box next to "Underline keyboard shortcuts and access keys," then hit the OK or Apply button to save.
    Enable underline shortcuts 
    Underlined shortcuts
    On the left, underlining is disabled. On the right, underlining is enabled.


  • Bypass the Recycle Bin
    The Windows Recycle Bin is a good safeguard against accidental file deletions. However, when you know you want to permanently delete a file, you can bypass it. Instead of pressing the Del key, press Shift+Del, then Shift+Enter to confirm. If you prefer, you can also permanently disable the Recycle Bin. First, right-click on the Recycle Bin, then choose Properties. Click on the drive you want to disable the Recycle Bin for, then select "Don't move files to the Recycle Bin. Remove files immediately when deleted." Click the OK or Apply button to save the changes.
    Disable Recycle Bin


Tags: useful command prompt commands windows 7  windows 7 useful shortcuts  run commands windows 7  chkdsk commands windows 7  windows 7 commands pdf  telnet in windows 7 commands  run commands for windows 7 pdf  grub rescue commands for windows 7


Windows 7 tips


  • Presentation Mode

    For those who regularly connect laptops to projectors and TV's you can now press the "Windows Key + P" to set the presentation mode of the laptop in Windows 7. You can redirect your display to the computer, projector or both.


    presentation-mode-windows7

  • Useful Shortcuts tips

    windows-key+P = lets you select the presentation mode and display output of your pc
    windows-key+E = Opens Windows Explorer.
    windows-key+(Minus or Plus Key) = Zoom in or out on the desktop.
    windows-key+Home = minimize all windows except the one you're working on.
    windows-key+Shift+Left/Right arrow = moves the current window between your monitors when you're using dual monitors. Very handy when your second monitor is turned off and you want to bring the off-screen app back across to your primary monitor. 

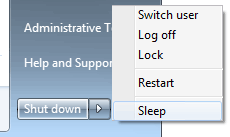
  •  Save Power Although not a new feature in windows 7 the sleep function is one of the most underutilized features of windows. Sometimes you've got a thousand windows open and you've suddenly got to take off either because your work friends are yelling out to go to lunch or the simpsons is about to start. Either way rather than just turn off the monitor because you don't want to lose your session the best thing to do is to select start-shutdown-sleep and the pc will quickly save your session and turn off. When you come back you can just press any key and your PC will power back on with the desktop exactly as you left it. This saves power, time, money and the environment so it can be quite worthwhile.
    sleep-windows7


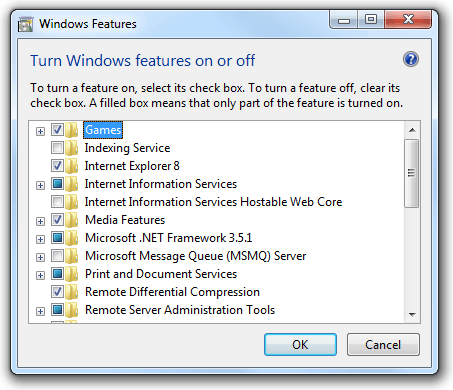
  •  If you're wondering where Movie maker and Messenger apps are then you need to visit www.download.live.com and download the free Essentials pack from Microsoft. Its not included in the standard install of Windows 7. For all other apps you can navigate to control panel > programs > turn windows feature on or off. Here you can add or remove any app that windows 7 has to offer. Make sure you give Windows 7 DVD Maker a whirl. Its perfect for getting your movies onto a DVD to watch on your TV.
    windows7-features


  • Services Tab in Task Manager

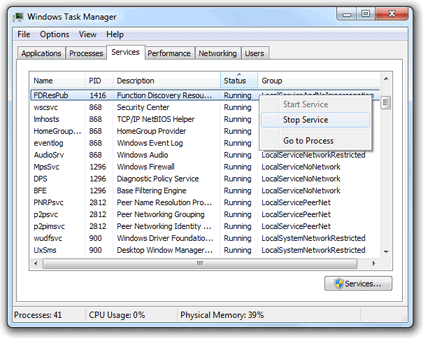
    Windows task manager (which can be accessed by either pressing CTRL-ALT-DEL or right-clicking on the taskbar and selecting Task Manager) now contains a new tab which lists all the services running on your system. This gives you quick access to start or stop a service. You can also click the services button to launch the full services console.
    task-manager-windows7


  •  Burn ISO files to CD/DVD An ISO is a CD or DVD image file that has a .iso file name extension. In windows 7 you can now burn these files directly to CD or DVD without the need for third party software. To burn an ISO file just double click it or select it in explorer and select burn from explorer's toolbar.


Shut down Windows


To shut Windows 8 down, just move the mouse cursor to the bottom right corner of the screen, click the Settings icon - or just hold down the Windows key and press I - and you'll see a power button. Click this and choose 'Shut Down' or 'Restart'.
In Windows 8.1, press Win+X, click 'Shut down or sign out' and select the option you need.
Some of the tricks available in previous versions of Windows still apply. Press Ctrl+Alt+Del, for instance, click the power button in the bottom right-hand corner and you'll be presented with the same 'Shut Down' and 'Restart' options.
And if you're on the desktop, press Alt+F4 and you'll be able to choose 'Shut Down', 'Restart', 'Sign Out' or 'Switch User' options.

How to Lock Portable Hardrive Data?


TrueCrypt is software system for establishing ANd maintaining an on-the-fly-encrypted volume (data storage device). On-the-fly cryptography implies that information is mechanically encrypted right before it is saved and decrypted right once it is loaded, without any user intervention. No information stored on AN encrypted volume is read (decrypted) while not mistreatment the right password/keyfile(s) or correct cryptography keys. Entire file system is encrypted (e.g., file names, folder names, contents of each file, free space, meta data, etc).
Files is derived to and from a mounted TrueCrypt volume similar to they are derived to/from any normal disk (for example, by straightforward drag-and-drop operations). Files square measure mechanically being decrypted on the fly (in memory/RAM) while they are being read or derived from AN encrypted TrueCrypt volume. Similarly, files that square measure being written or derived to the TrueCrypt volume square measure mechanically being encrypted on the fly (right before they are written to the disk) in RAM. Note that this doesn’t mean that the entire file that is to be encrypted/decrypted should be stored in RAM before it is encrypted/decrypted. There are no additional memory (RAM) requirements for TrueCrypt.
Let’s suppose that there’s AN .avi video file stored on a TrueCrypt volume (therefore, the video file is entirely encrypted). The user provides the right parole (and/or keyfile) and mounts (opens) the TrueCrypt volume. once the user double clicks the icon of the video file, the software package launches the applying related to the file kind – typically a media player. The media player then begins loading alittle initial portion of the video file from the TrueCrypt-encrypted volume to RAM (memory) so as to play it. while the portion is being loaded, TrueCrypt is mechanically decrypting it (in RAM).
Note that TrueCrypt ne’er saves any decrypted information to a disk – it only stores them quickly in RAM (memory). Even once the quantity is mounted, information stored in the volume is still encrypted. once you restart Windows or shut down your computer, the quantity are dismounted and files stored in it will be inaccessible (and encrypted). Even once power provide is suddenly interrupted (without proper system shut down), files stored in the volume square measure inaccessible (and encrypted). to create them accessible once more, you’ve got to mount the quantity (and offer the right parole and/or keyfile).


Download Now


Auto Shutdown

Auto End Tasks to Enable a Proper Shutdown

This reg file automatically ends tasks and timeouts that prevent programs from shutting down and clears the Paging File on Exit.
1. Copy the following (everything in the box) into notepad.
QUOTE
Windows Registry Editor Version 5.00
[HKEY_LOCAL_MACHINE\SYSTEM\CurrentControlSet\Control\Session Manager\Memory Management] “ClearPageFileAtShutdown”=dword:00000001 [HKEY_USERS\.DEFAULT\Control Panel\Desktop] “AutoEndTasks”=”1″ [HKEY_LOCAL_MACHINE\SYSTEM\CurrentControlSet\Control] “WaitToKillServiceTimeout”=”1000″ 2. Save the file as shutdown.reg
3. Double click the file to import into your registry.
NOTE: If your anti-virus software warns you of a “malicious” script, this is normal if you have “Script Safe” or similar technology enabled.

Retouching Tools Intro


All of us strive to capture the perfect picture every time, but we all know that perfect image can be a rare and elusive thing. That's where the magic of Photoshop's retouching tools comes in. The retouching tools include Blur, Sharpen, Smudge, Dodge, Burn, Sponge, Rubber Stamp, and the History Brush. While all of these tools have value, the two most important retouching tools are the rubber stamp and the history brush, so we'll be spending the most time discussing those.

At this point in the course, the Photoshop 5.x users should have a good grasp on how to access the options palette, and the Photoshop 6 users should be familiar with the options bar. For the remaining portion of the course, when I say "options" Photoshop 5.x users should know to double click the tool button to access the options palette, and Photoshop 6 users look to the options bar. If a tool is not behaving as you think it should, you can reset the tool to default options from the options palette menu in Photoshop 5.x or by double clicking the far left icon on the options bar in Photoshop 6.0.

All of the retouching tools use the brushes palette, and many of them have opacity or pressure controls, and blend mode options. Because we've discussed these options in previous lessons, I will not be repeating those explanations again. You may either review those lessons or consult your Photoshop User Guide if you need a refresher. I will only be discussing any new options within these tools.

The "Use all layers" option has also been discussed, but it deserves repeating here because it is so important to the retouching process. When use all layers is enabled, it allows you to sample from one layer, while painting your corrections onto another layer. If you use a new empty layer to paint on your corrections, you never have to worry about making a mistake, because you can just go back and erase from the layer containing your corrections.

Photoshop's Snapshot features is also extremely valuable in the retouching process. Always make a snapshot before you begin your corrections and after... there's nothing more satisfying than being able to flip back and forth between the before and after results to see what you've accomplished. You'll also want to get in the habit of taking snapshots periodically in the editing process so you can return to a previous state if things start going in the wrong direction. Remember, however, that snapshots do not get saved with your image. Once you close the image, any snapshots are deleted. If you want to save a snapshot permanently, you'll have to create a new document from it and save it under a different file name.

Here's a tip you'll use often when working with the retouching tools: the New View command. This command is located under the View menu and it allows you see the same image with multiple zoom levels on screen at the same time. When making image corrections it is always best to check your image at 100% magnification, but you will also want to get in close as you work. Rather than constantly switching zoom levels, simply choose View > New View and another window will appear. Zoom one window in on the area where you're working, put the other one to 100% magnification, and position the windows so you can see them both. And don't forget the spacebar shortcut for quickly switching to the hand tool temporarily as you work in a zoomed view.

With that out of the way, let's get on to the tools...


Xp Start Up Faster

How to make your Startup system faster than before?

I heard many complains from my friends that their computer have a very long startup process.In order to speed up your startup, there are 2 ways :

First Way:

Through MsConfig configuration-

1-)Open Start > Run,
2-)type in 'msconfig'.- Look for 'Startup tab' and click it.

You will see a screen similar to the one below:-This tab will show all programs that will be started when Windows boot up.

Now, uncheck some of the program that you think not important to be load during startup.(Like YM, MSN, winamp..)

Your Windows Xp should now startup faster because it will take less resources by not running these programs in the background.

Second Way:

Through 'Services.msc'-

1-)Open Start > Run,
2-)type in 'services.msc'.-Now you should see a similar screen.

This window show you more detailed processes that are startign up with windows.-"Automatic' means this program start automatically on booting.-So, its up to you to choose which programs/services are 'Automatic' or you can change its properties to 'Manual' or 'Disabled'.

try it & enjoy it.

Increase Internet connection speed in Windows XP

This tip is designed for increased BROADBAND speed in Windows XP, but it should work for 56k modems too.

QoS Packet Scheduler is a method of network bandwidth management that can monitor the importance of data packets and depending upon the priority of the packet, give it higher or lower priority or bandwidth levels. It's not very useful unless you're using apps which are QoS-aware or running a server, so you can gain some network overhead back by turning it off.

Note: This following tip will not work on XP Home Edition.

Make sure you're logged on as actually "Administrator". Do not log on with any account that just has administrator privileges

1-)Start > Run > type gpedit.msc (not available in home version)
2-)Select the Local Computer Policy branch,
3-)Select the Administrative Templates branch,
4-)Select the Network branch,
5-)Highlight the "QoS Packet Scheduler" in left window,
6-)In right window double click the "limit reservable bandwidth" setting,
7-)On setting tab check the ENABLED item,
8-)Where it says "Bandwidth limit %" change it to read 0 (ZERO),
9-)Close gpedit.msc

Effect is immediate on some systems, some need to re-boot.

try it & enjoy it

Followers